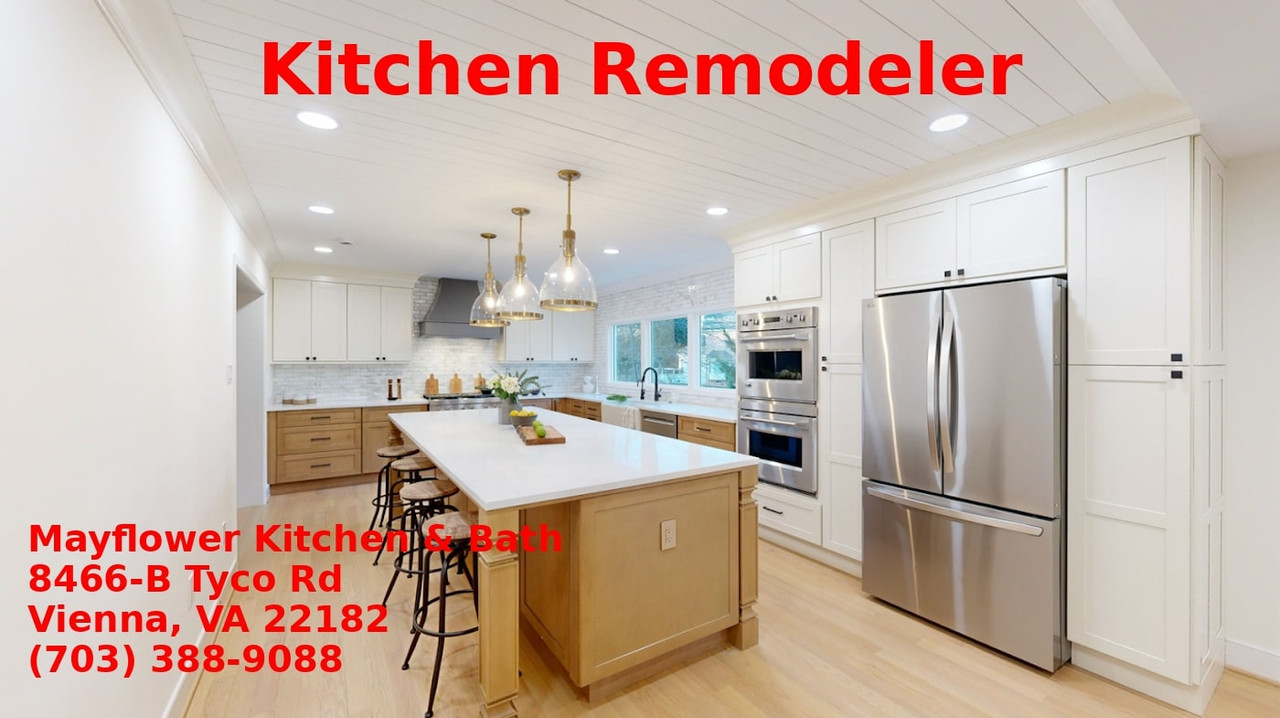
How to Communicate Your Vision to a Kitchen Remodeler
A kitchen remodel rides on communication. The smartest layout, the prettiest stone, the best appliance package will miss the mark if you and your kitchen remodeler never quite understood each other. I have sat at too many dining tables translating vague wish lists into drawings, and I have also watched great projects stumble because a single sentence in an email created a costly assumption. The good news: you can steer the conversation. If you approach a Kitchen Remodeling Company like a partner and give them the right inputs, the results tighten up, timelines shrink, and the finished space looks and works like you imagined.
This isn’t about micromanaging. It’s about setting a shared picture, validating it at the right checkpoints, and documenting trade‑offs so there are fewer surprises. Here is how to do that with the same thoroughness that the best Kitchen Remodeler Contractor brings to a job site.
Start with why, not what
The remodeler needs to learn your kitchen the way a tailor studies a body, which means understanding your daily patterns, not just your Pinterest board. When I ask a client to describe their morning routine, I am listening for the friction points: where the coffee grinder sits, which drawer has the mugs, who is in the kitchen at 7 a.m. for school lunches, how often the dog needs a water bowl. Those details shape aisle widths, landing zones, outlet locations, and sound control more than any finish sample.
Instead of opening with “I want an island,” explain why. Maybe the goal is to seat four teenagers for breakfast, run a teaching station for baking on weekends, and still keep clear circulation through to the back door. The island becomes a tool, not the idea. A Kitchen Remodeler will then suggest the shape, size, and overhangs that fit those behaviors, rather than guessing.
Don’t be shy about budgets during this early talk. You are not giving up leverage by naming a range. You are giving your team a constraint that leads to better ideas. I have seen a $45,000 scope outperform a $90,000 plan by focusing funds where they solve daily pain and scaling back in areas where stock works just fine.
Build a visual language that means the same to both of you
Words like “modern farmhouse” and “clean lines” spark different images for different people. Aligning on visuals is faster than arguing over adjectives. Do it deliberately.
Collect a tight set of images that show specific elements you like and dislike. Mark them up with notes. Circle the thin shaker rail, not the whole cabinet wall. Highlight the slab backsplash and write “no upper cabinets here.” If a certain kitchen looks calming, explain what creates that calm for you, whether it is continuous grain, matching sight lines, or muted tones with texture. I once had a client who said “no gloss,” but what bothered her was glare from undercabinet lights. We solved it by changing the light temperature and opting for a honed finish on the counters, while keeping lacquered doors that were easy to clean. The words didn’t change. The visual proof did.
Bring samples together under the same light you expect at home. Daylight shifts color temperature through the day, and artificial lights can swing 2700K to 4000K or more. I keep a small light kit in the car for evening meetings. If your remodeler doesn’t, take your samples outside or to a bright window. That granite with a subtle green vein can read gray at night and mint in the morning. You want to know that now.
Translate lifestyle into measurements
Kitchen design is part math, part choreography. Clearances, reach zones, and work triangles are not theory. They’re what keep shoulders and hips from colliding. A Kitchen Remodeler Contractor can calculate these, but your body, habits, and tools tweak the numbers.
Tell your remodeler the height of your most frequent cook. A 36 inch counter is standard. I have dropped counters to 34 inches for bread makers and raised them to 38 inches for tall clients who roll pasta every Sunday. If you bake often, you might want one lower marble section for kneading. If you batch cook with heavy stock pots, flag where those pots live. A drawer near the stove with a full-extension glide might beat a deep cabinet every time.
Inventory the appliances with exact model numbers early. Depth varies, even among counter-depth units. That affects panel flush lines and door swing clearances. A 36 inch French door fridge with 48 inch door swing needs a different set of landing zones than a 30 inch single door with a bottom freezer. Write down how far doors and drawers can open before they hit the island stools or a wall nib.
Ask for mockups when a dimension matters. I have laid painter’s tape on floors, stacked cardboard to represent an island, and shimmed stools to simulate knee clearance. In thirty minutes you can test: can two people pass behind the island when the dishwasher is open? Can the oven door drop fully without kissing the trim? Would a 42 inch aisle feel spacious or wasteful given your room’s span? Your back will thank you for these rehearsals.
Drawings are conversations, not verdicts
Expect at least three iterations of plans and elevations. The first should be a layout only, focusing on function and flow. The second can layer in cabinet styles, appliance choices, and storage strategies. The third should tighten dimensions and introduce materials. Rushing to a final when the layout still wobbles is how you end up with fillers and regrets.
Look past the pretty 3D views. Elevations reveal where upper cabinet bottoms align with the range hood, whether crown meets a beam, and how tall the backsplash will be. Sections show counter thickness, reveal around an integrated fridge, and the true height of toe kicks. Ask your Kitchen Remodeling Company to dimension these clearly. When you sign off, you are not just approving the vibe. You are approving the math.
Be ruthless with notes. Many of the biggest misunderstandings hide in small notations. If a drawing says “microwave drawer 24 inch,” confirm the model and rough opening. If it says “tile to ceiling,” verify whether that means behind the hood only or on every wall. If a note reads “island waterfall,” decide if you mean both sides or one.
Budget clarity that survives the real world
Numbers flex. The best remodelers budget with contingency baked in, but transparency beats optimism. Ask for an estimate broken into labor, materials, and allowances, not a single lump sum. Allowances should name specific tiers: for example, “tile allowance at $12 to $16/sq ft material cost” or “plumbing fixtures allowance for sink and faucet at $1,200 total.” Vague allowances are where scope creep hides.
Permits, inspection fees, and required upgrades such as GFCI circuits, AFCI protection, or make‑up air for higher CFM hoods can add several thousand dollars. If your city triggers a make‑up air requirement over 400 CFM, that affects both budget and ductwork planning. Name these realities up front. A Kitchen Remodeler who avoids that conversation is teeing up a surprise.
When the first demolition day reveals a crooked wall, a vent stack, or knob‑and‑tube wiring, you want a change order process that is simple and fast. Agree on a procedure: how you will receive the scope change, how pricing is presented, and how approval is recorded. I’ve had projects stay on track because we committed to 24 hour turnarounds on small change orders and weekly recaps on larger ones. Discipline with paperwork keeps sawdust from clogging the relationship.
Materials: the right detail beats the trendy choice
A material palette looks simple on a mood board, but it comes alive in edges, profiles, and terminations. That is where communication often falls apart, because people assume default details will match their vision. They rarely do.
If you choose a quartz counter, pick the edge profile and thickness. A 3 cm slab with a simple eased edge reads contemporary. A laminated mitered 2 inch edge looks monolithic and heavy, which can fight with delicate shaker doors unless the other elements balance it. For solid wood butcher block, decide on oil or factory finish, and discuss seam placement relative to sink cutouts. For stone with movement, ask for a dry lay or slab layout drawings. I have moved sink cutouts two inches to catch a particular vein and it changed the entire feel of the island.
Tile needs exacting layout. Ask how the installer will handle the last column at a window edge or the transition to drywall. A centered layout under a range hood may create tiny slivers at a cabinet end. You can avoid that with a shifted centerline and a conversation before anything is glued.
Hardware deserves a mockup. Pull size, screw spreads, and placement within rails change the look and the ergonomics. On tall pantry doors, a longer pull at mid‑height feels right. On narrow drawers, a centered knob can look better yet be irritating to use. Measure your hand span. Try a few in place with painter’s tape. It’s a ten minute exercise that ends days of second‑guessing.
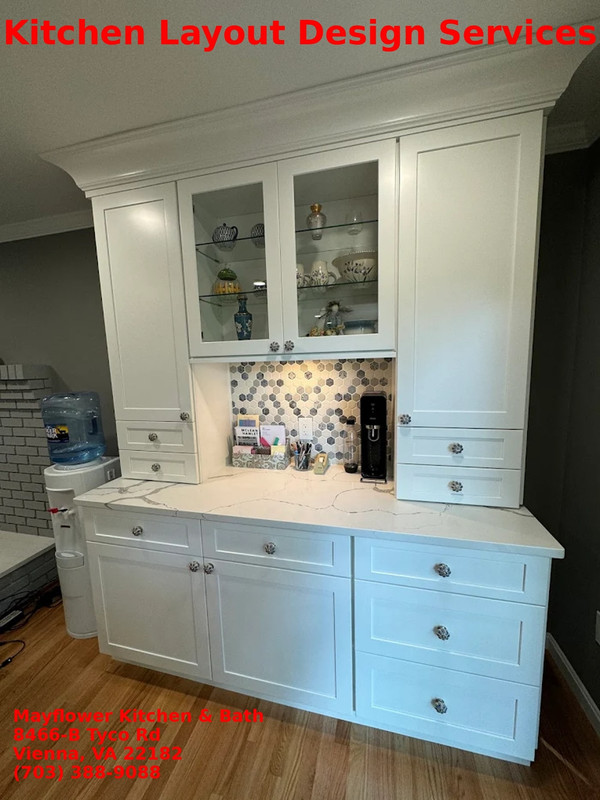
Storage strategies that match your tools
Generic cabinet plans fill space. Smart storage plans empty counters. Your remodeler can design rollouts, dividers, and custom inserts that turn daily chores into quick motions, but only if they know what needs a home.
Open the conversation with a literal count: baking sheets, cutting boards, large mixing bowls, Dutch ovens, small appliances you keep handy. If you own a 7 quart stand mixer and actually use it, plan a lift or a nearby shelf at wrist height. If you keep twelve spices on rotation and the rest in the pantry, you might want a narrow pullout by the range for the core set and a bigger organizer elsewhere for the extras. If you buy Costco bulk, standard pantry depths might hide things. A shallower pantry with more doors can keep visibility high and waste low.
Think in motions per week. If you make espresso daily, the station should live within a single zone with cups, sugar, grinder, and a knock box, plus an outlet tied to a dedicated circuit if your machine draws heavy amperage. Pour‑over enthusiasts often prefer the sink side and a kettle station with filtered water. These details are the difference between a pretty kitchen and one that eliminates friction.
Lighting as a layered plan, not an afterthought
Kitchens need at least three layers of light: task, ambient, and accent. Describe the mood you want at each time of day. If you cook at night, invest in continuous undercabinet lighting that reaches the counter front. Diffuse LED tape paired with a good channel eliminates hot spots. Puck lights look quaint but spotty unless placed with care.
Over islands, the number and size of pendants tie to island length, ceiling height, and sight lines. For an island around 8 feet long, two pendants at 14 to 18 inches diameter with 30 to 34 inches of clearance above the counter often feel balanced. Taller ceilings might warrant larger fixtures hung slightly higher to keep them out of the way of conversations and views. Dimmers across all zones give you control, especially for evening gatherings when you want the backsplash to glow but not the room blazing.
Don’t ignore color temperature. Decide on a range and stick to it, or you will have patchwork light. Warm 2700K reads cozy, 3000K strikes a balance with natural light, 3500K to 4000K can sharpen white cabinets but make wood look cooler. Lay out samples under your chosen temperature to avoid surprises.
The contractor conversation: what to ask and how to listen
A Kitchen Remodeler Contractor who communicates clearly is worth the premium. During interviews, listen less for sales polish and more for process detail. You want to hear how they handle daily dust control, where tools live at night, what their typical day looks like on site, and how they coordinate with trades. Ask who will be your point person and how many concurrent jobs that person runs. If they claim to be on site every day but manage five projects, your reality will differ from their promise.
References are not just happy stories. Ask previous clients what went wrong and how it was handled. Every project has hiccups. The way a contractor documents and resolves them reveals more than any portfolio photo.
If you are working with a design‑build Kitchen Remodeling Company, pin down how design feeds into Kitchen Layout Design Services production. Do their carpenters work from the same annotated drawings you approved, or do those details get translated into a different format? I once watched a shadow reveal on a toe kick disappear because the field crew had an older set of drawings. A weekly plan review, with both the designer and the site lead present, would have saved the day.
Schedules that breathe but do not sprawl
Renovation schedules need enough air for inspections, lead times, and curing. They also need discipline, or four weeks creep into six. Your remodeler should present a critical path schedule that names durations and dependencies, not just a vague start and finish date. Appliances arriving late will stall cabinet installs. Countertops cannot be templated until cabinets are fixed and level. Tile cannot go up until the walls are closed, primed, and flat.
Talk about lead times early, especially for custom cabinets and specialty appliances. Cabinets can run 6 to 12 weeks depending on the shop and finish process. Some ranges and panel‑ready dishwashers have lead times that jump unexpectedly. Build a buffer. Agree on a rule that no demo starts until all long‑lead items are confirmed with delivery windows. Living without a kitchen while you wait for a backordered sink strainer is a special kind of misery.
Plan a weekly meeting cadence, even if brief. Ten minutes every Tuesday morning can keep subs aligned, decisions made, and small issues contained. If you travel, designate a proxy decision maker with your preferences documented to avoid delays.
Put it in writing, make it visual, keep it central
The best communication tool is a project manual, even a lightweight one. It should include:
- A final, dated drawing set with dimensions and notes, plus any 3D views that clarify intent.
- A specifications schedule listing every selected item with brand, model, finish, and install notes.
This manual reduces decisions to a single source of truth. Digital tools like shared folders or project management apps help but only if someone keeps them current. Ask your Kitchen Remodeling Company who owns updates. If you change a faucet, the spec sheet in the folder should change the same day, or plumbers will install what the old sheet shows.
Label boxes when deliveries roll in. Check items against the spec list. Open boxes to confirm finishes and quantities before the return window closes. You are not being difficult. You are protecting the schedule.
Communication during construction: short, frequent, and visual
Once demolition starts, the pace of questions accelerates. Keep answers quick and framed with photos. A site lead texting you two pictures of the wall behind the range and asking “center hood on stud bay or maintain distance from window trim?” is a gift. Respond with a marked‑up image or a quick call. If you wait a day, you lose momentum and possibly a day of labor.
Respect the chain of command. If you hired a Kitchen Remodeler Contractor with a project manager, route design questions through them, not directly to subs. Well‑intended hallway directions can unravel the plan. If you see something wrong, document it with a picture and your drawing note, then bring it to the project manager. You will be heard, and the fix will stick.
Walk the site at key milestones. After framing and rough‑in, check outlet locations, sconce heights, and switching. After drywall, review tile layout lines and cabinet blocking. After cabinet install but before counters are templated, assess overhangs and appliance fits. Bring tape, a level if you have one, and your manual. Calmly flag discrepancies and agree on fixes with a date.
Managing trade‑offs without losing the thread
Every project faces a fork in the road. Maybe the slab you loved has a fissure near the sink cutout. Maybe a duct needs to move and steals three inches from the pantry. The way you weigh those decisions matters. Tie each choice back to the goals you set at the start.
If your aim was a quieter morning routine, spend on sound‑insulated dishwasher panels and a soft‑close waste pullout, not on a second set of glass uppers. If the budget tightens, use the edit scalpel, not the axe. Swap the decorative panel on the back of the island to a painted finish but keep the drawer stack that holds daily tools. Drop the waterfall if it funds task lighting that keeps knives safe and eyes relaxed.
When an aesthetic dream fights a practical constraint, ask for a mockup or a sample. I once tested three grout joint sizes on a backsplash, each only two feet wide. The client’s favorite was the smallest joint, but the tile had slight warping that would have made the lines wavy across eight feet. Seeing a larger test convinced them to choose the wider joint that looked straighter at a distance. The win wasn’t the joint size. It was the process of proof.
The final 5 percent: punch lists and care
The last stretch feels endless, but this is where clarity pays off. Create a punch list room by room with your remodeler. Stand in one spot, look left to right, then up and down, then move to the next spot. Note paint touch‑ups, cabinet door alignment, caulk gaps, appliance panel reveals, and outlet cover alignment. Keep it factual. Skip adjectives and judgments. Photos help.
Ask for a maintenance guide. Every material behaves differently. Quartz likes mild soap and water, not abrasives. Marble forgives scratches with patina but punishes red wine left overnight. Oiled wood needs re‑oiling on a schedule. Hardware loosens with seasonal movement and should be snugged occasionally. If your Kitchen Remodeling Company does not offer a care sheet, write one together with the manufacturer guidelines pulled into a single page you can stick on the inside of a pantry door.
Schedule a 30 to 60 day follow‑up. Wood moves with humidity cycles. Doors may need slight adjustments. A quick visit can dial everything back in before little quirks grow.
When to push, when to trust
Strong projects balance your conviction with your remodeler’s craft. Push when the design intent is clear and the alternatives dilute daily function. Trust when your team raises red flags tied to structure, safety, or code. If your contractor tells you that venting that 900 CFM hood through a long horizontal run will reduce performance and risk condensation, listen. If they suggest swapping a planned drawer stack for a door because “that’s how we always do it,” ask to see the drawer option mocked up and priced.
Question advice once. If the answer references code, manufacturer instructions, or field experience with specifics, you likely have your answer. If it rests on habit or vague comfort, request a second opinion from the designer, the manufacturer rep, or another licensed trade.
A quick checklist for a clean start
- Define goals in terms of daily life, and share routines that matter most to you.
- Gather focused visuals with annotated likes and dislikes, then review them under consistent light.
That simple list anchors bigger conversations, and it gives your Kitchen Remodeler a head start on the right plan.
What a good relationship feels like
On projects that hum, conversations shift over time. Early meetings are big‑picture and imaginative. Mid‑design meetings are detailed and precise. Construction meetings are brisk, tactical, and visual. The tone stays respectful. People own mistakes quickly and fix them without drama. You hear the phrase “let’s check the drawings” often. You are invited to decide with evidence, not fear.
A kitchen that works for your family is not a trophy. It is a tool that rewards clarity. Communicate your vision by grounding it in how you live, turning design language into shared visuals, pinning decisions to measurements, and keeping documentation tight. The right Kitchen Remodeling Company will meet you halfway with process, craft, and candor. Put those together, and you will step into a space that feels inevitable, as if it was always meant to be there, because you and your team built the same picture from the start.